
23
Jul

Date
6 July 2026
Author
Greg Eden
Estimated reading time
7 minutes
If you spend time boating in the UK, you already know how quickly a cabin can turn cold and damp. A Webasto Air Top heater is a smart upgrade for boat owners who want reliable cabin heat without the noise, hassle, or running costs of portable alternatives.
At JPC Direct, we install marine heaters for customers who want to extend their season, improve comfort onboard, and make weekends away more enjoyable. This guide explains the installation process in plain English, so you know what’s involved before you book a fitting.
NB: All Webasto heater installations by JPC Direct will be subject to a 3-Year Parts and Labour Warranty, and will guarantee expert after-market technical support.
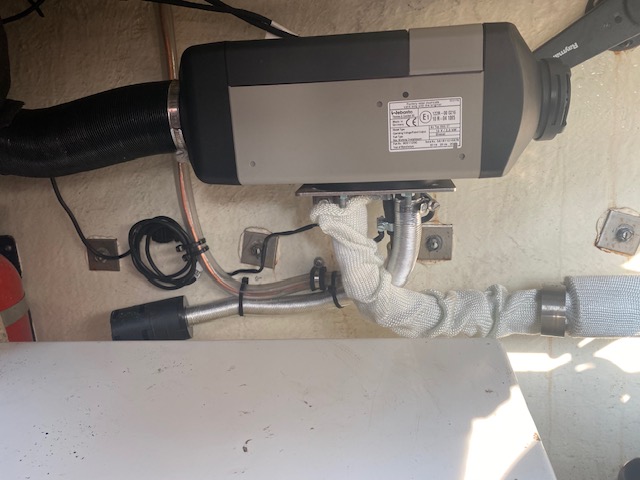
Before any installation, we make sure the heater is the right size for the boat and the spaces it needs to warm. We also check where the unit can safely sit, where the fuel supply will come from, how the exhaust will be routed, and where the warm air will be delivered.
A good installation is not just about fitting a heater. It’s about making sure the whole system works efficiently, safely, and neatly for the long term.
A Webasto Air Top is a diesel-powered cabin heater that warms the air inside your boat and circulates it through ducting into living spaces. It’s a popular choice for cruisers, narrowboats, and other leisure craft because it provides quick heat, takes up little space, and can be controlled easily from inside the cabin.
For many boat owners, the big advantages are simple: warmer mornings, less condensation, and a more comfortable boat in colder months. It also makes overnight stays and early-season trips far more enjoyable.
The first job is choosing the best spot for the heater unit. This needs to be somewhere accessible for servicing, protected from moisture, and positioned so the warm air can reach the areas you use most.
We usually look for a location that keeps pipe runs short and reduces bends in the ducting. That helps the heater work better and keeps the installation tidy.
Once the location is agreed, we secure the heater to a solid mounting surface. The unit needs to be fixed firmly so it won’t move when the boat is underway.
This stage also includes making sure there is enough space around the heater for airflow, maintenance, and safe operation. Good mounting is important because it supports the whole system and reduces vibration and noise.
A Webasto Air Top heater usually runs from the boat’s diesel supply or from a dedicated fuel source, depending on the setup. We fit the fuel line carefully and position the fuel pump in the right place so the heater receives a steady supply.
This part of the installation needs to be done neatly and securely. The fuel line must be protected, clipped correctly, and kept away from hot or moving parts.
The exhaust is one of the most important parts of the job. It carries combustion gases safely outside the boat, so it must be routed and sealed properly.
We fit the exhaust in a location that keeps fumes away from cabins, air intakes, and boarding areas. We also make sure it is installed with the correct heat protection and clearances.
NB: Exhaust gases from a Webasto heater are dangerous and must be handled with care. They can contain harmful fumes, so the exhaust system must be routed, sealed, and tested correctly to keep them safely outside the boat. For this reason, all exhaust work during a heater installation should be carried out by a qualified professional.
The heater needs a clean air supply and a route to send warm air into the boat. We install the intake and ducting so the airflow is balanced and efficient.
This stage is where the comfort of the final installation really starts to take shape. We position outlets in the best places for even heat distribution, rather than just putting them wherever there is space.
Next, we connect the control panel and electrical supply. This allows you to switch the heater on, set the temperature, and manage the system from inside the boat.
We keep the wiring neat, secure, and easy to understand. A clear control setup makes the heater much easier to live with day to day.
Once everything is installed, we test the full heater system. That means checking the fuel flow, exhaust, airflow, temperature control, and overall performance.
We also look for leaks, unusual noises, and anything that could affect efficiency or safety. This final stage is where we fine-tune the installation so it performs as it should.
Before we finish, we walk you through how to use the heater properly. That includes starting it, adjusting the settings, and understanding the basics of running it well.
We also explain simple care tips, like keeping vents clear and using the heater regularly to help it stay in good condition. A little knowledge goes a long way in keeping the system reliable.
Most installations take a full day, though more complex jobs can take longer. The exact timing depends on the boat, the heater model, the fuel setup, and how much ducting and wiring is needed. We always aim to complete the job neatly and without rushing.
Not every boat is the same, but Webasto Air Top heaters can be fitted to many leisure boats, including cruisers and narrowboats. The key is making sure the heater size, mounting position, fuel supply, and exhaust layout suit the boat properly.
For most boats, a diesel air heater is the more practical choice because it gives strong heat without needing shoreline power. Electric heating can work in some situations, but it usually depends on the boat’s power setup and how you use it.
That depends on the boat’s size, layout, and ducting. A correctly specified Webasto Air Top can heat cabins very effectively, especially when outlets are positioned well. In larger or more open boats, we may recommend a system layout that spreads heat more evenly.
Some owners are tempted to fit a heater themselves, but marine heater installation needs careful attention to fuel, exhaust, electrical, and ventilation details. A professional installation helps reduce risk and gives you a cleaner, more dependable result.
At JPC Direct, we aim to make heater installation straightforward for boat owners who want a warm, comfortable cabin without the stress. We work carefully, keep things practical, and explain the job in plain English so you know what’s happening at each stage.
If you want a Webasto Air Top heater fitted to your boat, we can help you choose the right setup and install it properly for reliable use on the water.
23
Jul
20
Jul

16
Jul

09
Jul

08
Jul

06
Jul

13
Apr

09
Apr
15
Feb
06
Jan

28
Sep

22
Sep
18
Jul

14
Jul

14
Jul

14
Jul

14
Jul

14
Jul

08
Jul

05
Jul

11
Mar

15
Sep
25
Aug

19
Aug

29
Jul